Efficient and Flexible Breadmaker Dough
Make frybread/naan, hamburger/hotdog buns, dinner rolls and regular bread all from same streamlined system
Preparation ingredients (per loaf):
1.1 cup water (a little more than a cup)
2 tablespoons sugar or honey
2 teaspoons salt
2 tablespoons oil
Breadmaking ingredients:
Whatever seasonings you want (you’ll need a lot of seasoning). Mrs. Dash or a knockoff salt-free seasoning is wonderful. Minced garlic, rosemary, and finely chopped onion are all great options. For sweet breads like cinnamon-raisin bread you can add a few extra tablespoons of sugar along with your cinnamon (or I prefer pumpkin spice).
2.2 cups flour (I have a 2 cup measuring cup that I fill a little overflowing. You may have to experiment)
.8 tablespoon (or most of a tablespoon) dry instant yeast
Preparation step:
To make this real efficient we will prepare the ingredients for multiple loaves of bread. Line up a bunch of mason jars (or in my case I use leftover cheese sauce jars). Put a little more than a cup of water in each. To make this easier you can mark a line on each jar so you know exactly how much to put in so you can skip the measuring cup.
Next add 2 tablespoons sugar, 2 teaspoons salt and 2 tablespoons oil in each jar. Seal the jars and store in the refrigerator for next time you make bread.
Dough making step:
Pull one of your jars out of the fridge (I call it breadwater). Open the jar and pick out some seasonings. Dump a couple tablespoons worth of seasonings in the jar, close it up and shake well. Dump this in your breadmaker. Next, measure out a bit more than two cups bread flour and dump that on top of your water. Then sprinkle a bit less than a tablespoon of yeast on top of the flour.
Loaf of Bread:
For a regular loaf of bread, just choose your preferred setting and let the breadmaker do the rest of the work. I often set the breadmaker to sit idle for 30 minutes before it starts to allow the yeast and breadwater to warm up to room temperature. I have no idea if this actually makes a difference though.
Hamburger/hotdog buns and dinner rolls:
Set your breadmaker to “leavened dough” which means dough that’s had a chance to rise. This should take an hour and a half or so. When finished, put some flour out on your cutting board and take out the dough.
Form into proper bun shapes. You can roll out the dough and use cookie cutters or a small bowl to get round buns. Put on a sheet pan with some parchment paper (I forgot the parchment paper and it wasn’t the end of the world. It just requires slightly more scraping and cleaning.) Cover loosely with saran wrap and let them sit for a while, like half an hour or so to rise.
Bake at 375 for 15 or 20 minutes but watch them closely because they are easy to overcook.
I want to experiment with cooking these at a lower temperature as well as putting melted butter or egg wash over them just before going in the oven.
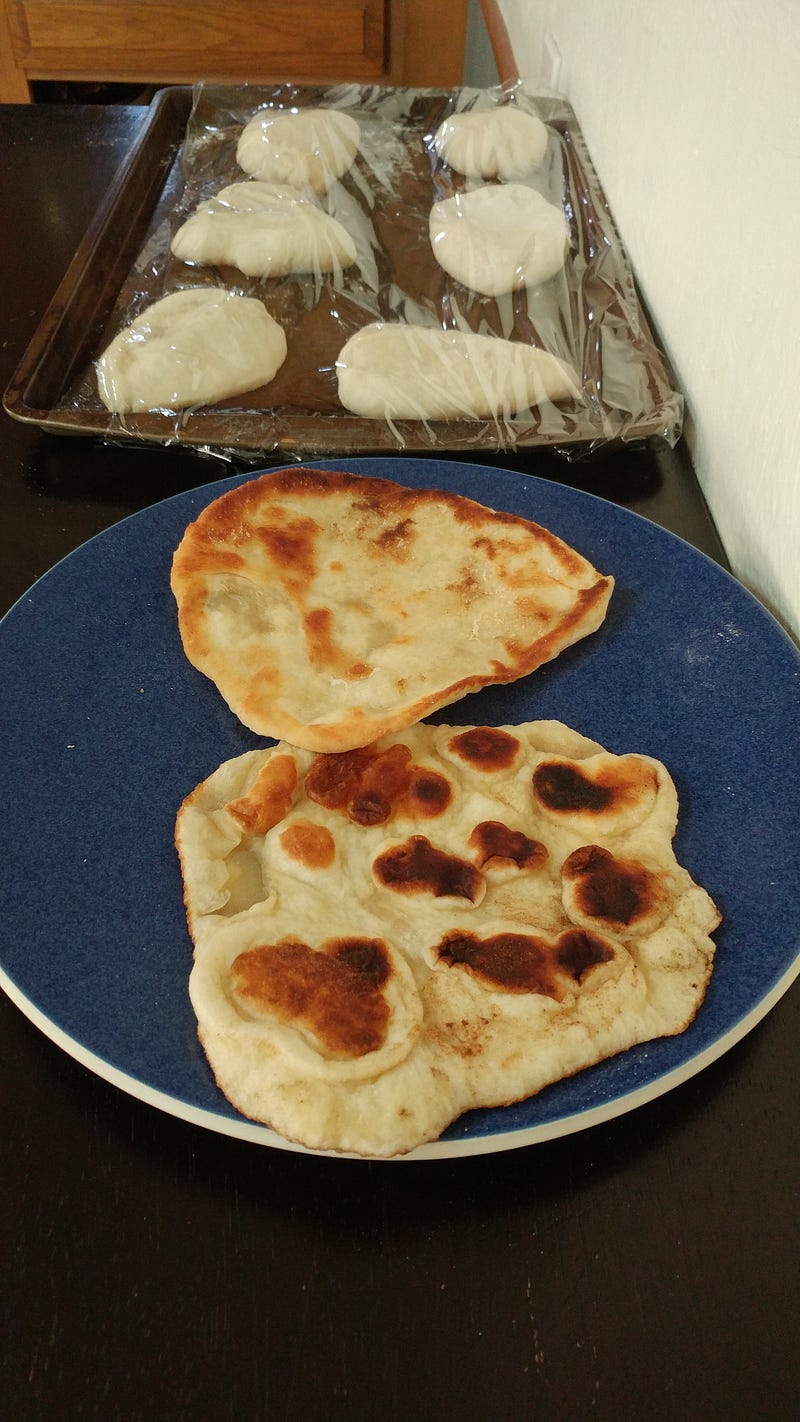
Frybread/Naan:
Follow the first step for Hamburger/hotdog buns and dinner rolls to make your leavened dough but instead of forming into bun shapes, take out a rolling pin (or in my case a wine bottle wrapped in saran wrap) and roll them out really flat.
Heat up a skillet to med-high and put in a decent layer of oil (I use avocado oil). You want it to be really oily but not deep fried. Although deep fried might be good too. If you did this with a sweeter dough it might be similar to an elephant ear you get at the fair.
Just toss your flat dough into the pan and watch it closely as it only takes a minute or so on each side. It will puff up a bit as it cooks. I used tongs to flip it.
Pull it out of the pan and immediately use a paper towel to pat off any excess oil.